Monday, 29 September 2014

Bleach London: Super Cool Colour Hair Crayons Review

Mermaid hair - is it just me or isn't that what we're all really after these days?............Oh, right, so is it just me.  Well this post just got real uncomfortable real quick.  Ok, so not everyone wants mermaid hair (I'm pretty sure subconsciously you do though so maybe stop lying? Cool. Thanks.) however Bleach London's Super Cool Colour Hair Crayons allow anyone and everyone to have some crazy fun with their hair without the commitment that you get with hair dye, semi-permanent or not.  These crayons are perfect to add vibrant colour to your hair and know that come Monday it'll have washed out a treat so that your hair will be office-ready and your manager won't need to take you aside to question those festival-ready turquoise hair streaks. 

After trying Bleach London's Super Cool Colour semi-permanent hair dyes, I wanted to try hair colour that was more of a one-day only kind of deal as I have commitment issues when it comes to hair dye.  I picked up my Bleach London Super Cool Colour Hair Crayons in the shades Washed Up Mermaid (like I said, everyone - whether they know it or not - wants mermaid hair) and Out of the Blue from Boots, they're fairly reasonably priced at £4 each plus they're quite big so I reckon I'm going to get a lot of use out of them! 


Bleach London Super Cool Hair Colour Crayons in Washed Up Mermaid
and Out of the Blue available from Boots (RRP £4)

The Washed Up Mermaid shade is a grungy, under-the-sea style of green which immediately made me want to burst out singing 'THE SEAWEED IS ALWAYS GREENER...'** in a decidedly dubious Jamaican accent.  The Out of the Blue hair crayon is a deep, rich blue which is completely mesmerizing with its eye-catching allure.

(**If you don't hear that quote in your head being sung in the voice of Sebastian the crab then there is something drastically wrong with you.)

The hair crayons are very easy to apply and you really don't need to be skilled in hairstyling to use them.  The most important thing that I think is worth mentioning however is to make sure that you either wear old clothes when applying the hair crayon or a towel wrapped around you whilst doing it over the sink as the dust/particles from the hair crayon have the potential to coat surfaces and can stain.  Protection clothing aside, I didn't actually find that much mess came from these hair crayons, I think that as long as you're careful and apply it over a sink then you'll probably be fine but it's always better to be safe than sorry and not risk staining your favourite top! 

Top to bottom: Bleach London Super Cool Colour Hair Crayon in Out of the Blue, hair sharpener included
with each hair crayon and Bleach London Super Cool Colour Hair Crayon in Washed Up Mermaid. 

To apply the colour to your hair, all you do is grab a small section of hair and colour it in like you would if you were colouring in a picture, you then grab a brush and brush through and repeat the process to build up the vibrancy and shade of the colour until you're happy with the finished effect. 

I tried the crayons on both the blonde ends of my hair and my darker natural colour and it showed up well on both sections, it did look more striking on the lightened ends of my hair but that being said, it still looked pretty great on the darker sections too.

The outcome..............already feeling a tiny bit mermaid-ey!

Depending on the thickness and length of your hair, the application process can be a little time consuming but not painfully so - you just need a little patience - plus, the process of colouring in your hair is actually quite therapeutic!

Colouring in my hair braids is my new favourite thing to do!

These hair crayons are perfect for festivals and will no doubt come in handy for Halloween festivities, plus let's not forget that the Christmas season will soon be here and these would not only make amazing stocking fillers or Secret Santa presents but will also make sure that all eyes are on you (for the right reasons and not because you slipped over on a half-eaten mince pie!) at the annual obligatory Christmas office party!

Washed Up Mermaid into Out of the Blue dip dye effect.
(Clearly got a little over excited in this photo, either that or I'm yawning!)

 
Have you used any of the Bleach London Super Cool Colour Hair Crayons? - Drop me a comment and let me know!

Sunday, 28 September 2014

Bleach London: Super Cool Colour Awkward Peach and Rosé Review

I am fully comfortable admitting that I'm completely obsessed with Bleach London and I often while away the hours scrolling through their pics on Instagram and tweets on Twitter, like I said, I'm obsessed (but in a totally healthy kind of way). 

Having visited their hair salon at their Topshop concession in Oxford Circus (their main salon is in Dalston) where I treated myself to a 'Bleachenders' dip dye about a year and a half ago, I figured that although I can't currently afford to get my hair done there, there's nothing stopping me from enjoying some of that Bleach London fun and trying out some of their products at home.   

The first products from the Bleach London range that I tried out were two of the dyes from their Super Cool Colour range which I used back in July (I miss summer so much!) as I had a night out planned and wanted to refresh my slightly dulled-blonde dip dyed ends.  The two hair colours that I used were Rosé and Awkward Peach as I wanted a pinky-based colour with a peachy tone to it.


Left to right: Bleach London Super Cool Colour in Awkward Peach (150ml) and Bleach London Super Cool Colour in Rosé (150ml) both available from Boots (RRP £5) .

I mixed half the Rosé with half the Awkward Peach in a tinting bowl and applied it using a tinting brush to my shampooed, towel dried hair.  I only applied the dye to the ends of my hair as this was already lightened from when I'd last had my hair dip dyed.  The instructions state to leave the colour on for 15 minutes but I left it on for an extra 5 minutes because, well, what can I say?  I'm a daredevil who occasionally rebels against hair dye instructions when it comes to timing, it's just the way I was made.

After washing it out and blow drying it, I had a gorgeous, rich, peachy-pink colour on the ends of my hair which I fell instantly in love with.


Looking super serious here!

These dyes are semi-permanent and according to the packaging they last about 2-10 washes which was fine by me as I wanted a colour that would wash out fairly easily.  I found that after the first wash, the majority of colour came out but it left a gorgeous, peachy tint which I think I actually preferred to the vibrant colour that it had previously been.  Overall, the colour lasted about 3 washes which I was fine with as they were more pastel-based shades so you wouldn't expect them to really last much longer than that.  I would definitely recommend both Rosé and Awkward Peach from Bleach London's Super Cool Colour range to anyone as these shades allow you to play about with your hair colour without the commitment and maintenance that comes with some other so called 'semi-permanent' hair dyes -  I definitely can't wait to try out some of their other shades now!


Slight peachy/pinky tint after one wash.  Nice!

I'll be blogging about Bleach London's Super Cool Colour Hair Crayons in my next post so be sure to keep an eye out for that.......only if you want to keep an eye out for it though.......no pressure here!

Have you used any of Bleach London's Super Cool Colours? Drop me a comment below if you feel like it and let me know what you think?

Saturday, 27 September 2014

The Ten Best Things About Being...............

 
Life isn't easy being a petite gal, but that doesn't mean to say that there aren't some added perks to being lacking in a few extra vertical inches, check out my list below of the ten best things about being petite:

1. You're the master of hide and seek, no space is too small for you to squeeze your tiny self into!


2. You have a legitimate excuse to wear fierce heels no matter what the occasion, for example, added heel height is a necessity when trying to reach the top shelf in a supermarket, and to quote Beverly Hills' finest real housewife, Adrienne Maloof (she's actually pretty deep, you guys!) - 'The higher the heels, the closer to God' - and you can't argue with that kind of logic.


3. It's rare that you'll ever have to worry about being taller than a guy.


4. You'll always look younger than your actual age, which may be annoying when you're in your twenties, but once you hit the big 3-0, you'll be grateful to that sales assistant who ID'd you for that bottle of Merlot (because that's what you drink when you're in your thirties).


5. You can buy oversized tops (or go a few sizes up in a top) and wear it as a dress.  It'd probably be a mini dress but that's cool, I'm totally on-board with that.


6. You'll never have to worry about your feet hanging out the end of the bed.  Nobody likes cold feet, in literal OR metaphorical terms.


7. Flying economy class on a plane is bearable due to your legs not taking up loads of room and thus giving you plenty of space to wriggle about for maximum comfort - and trust me, you'll be thankful for that on those pesky long-haul flights!


8. Being cramped up in a bath tub is something that you are unlikely to experience with the length of the bath ALWAYS being longer than the length of your body.


9. Petite fashion lines from the likes of Topshop, ASOS and Miss Selfridge are getting increasingly more exciting and often you'll find petite exclusives, meaning unless you're 5ft3 or under then you're not invited to this party - so keep on walking sister!


10. Sofas are the perfect length for you to take a nap on without being all scrunched up and contorted into weird and painful shapes.


I just want to point out that this list doesn't mean to say that there's anything wrong with being tall, I just think that you should love your height, no matter how tall, small or averagely proportioned you are - so at the end of the day, whether you're barely pushing 5ft or so past 6ft that it's nothing more than a distant memory, just OWN IT.  Also apologies for my terrible drawings - they're pretty bad but I sure do like to doodle!


Thursday, 25 September 2014

September Reading

It's fair to say that I'm going through a bit of a reading phase at the moment and I just can't seem to stop.  I LOVE reading and thanks to my English Lit degree, I can quite easily get through a book a week (I remember when I used to have to get through at least three books every week for my degree!  God, that seems like forever ago! How depressing.). 


Anyway, I'm not going to lie to you right now, I love me a bit of YA (Young Adult - for those not in the know!) fiction which is why my first book of September was Requiem by Lauren Oliver.  This dystopian novel is part of the Delirium trilogy centred around a young girl called Lena who lives in a society where love is deemed a disease and when people reach a certain age, they are 'cured' of this 'affliction'.  This is a great trilogy but as much as I enjoyed the first two books, I felt that Requiem was not quite as superior, mostly due to its slightly lacklustre ending.  For me, I like an ending that ties everything up which I didn't really get from Requiem, despite that, I still think that it's an excellent trilogy - it's addictive, exciting and really well written so I would most definitely recommend it, plus it's a great way for newbies to dip their toes into the pools of YA fiction!


The second book that I moved on to was Before I Go to Sleep by S. J. Watson.  You may recognise the title of this book due to the fact that a film version of it has just been released which stars Nicole Kidman, Colin Firth (*cough* Mr Darcy) and Mark Strong (click here to check out the trailer).  My mum recommended this book to me and it has to be one of the best books that I've read in a very long time!  This is one of those books that you just can't put down and find yourself awake until 3am still reading it and wanting to find out what happens next.  Without ruining the plot too much, this book is about a woman who is an amnesiac and wakes up everyday with no memory of her life after her teens/early twenties and sometimes no memory after her childhood.  I don't really want to say too much about the plot because the less you know, the better when it comes to this novel.  I'm incredibly excited about seeing the film and how the story translates onto the big screen as I think that it has the ability to be just as effective in the movie medium as it is in the written word.


The third book of my September reading was Gone Girl by Gillian Flynn.  This was, yet again, another recommendation from my mum (it's true what they say, mums really do know best, just don't tell my mum that I admitted that, ok?) and I was determined to read it before the movie came out (which I believe is the beginning of October. Click here if you want to watch the trailer).  Without revealing any spoilers, the only information about this book that can be given is that it's about a wife who goes missing so I guess the title's pretty self-explanatory really - there is a girl who has gone.  Gone Girl is full of twists and turns and these twists and turns actually made me gasp out loud on countless occasions (luckily, none of my gasps occurred in public otherwise I would have got a few concerned looks!).  It's also quite a disturbing story but it's one that is such an addictive read.  I wasn't a massive fan of the ending as it was a bit too ambiguous for my liking but I'll be interested to see if the film version will change it up a bit.  If you like psychological plots with twists throughout then this is a great book to go for!


Finally, the current book that I'm reading at the moment is Boy Nobody by Allen Zadoff (such a great name!).  Zadoff's novel is another one from the YA fiction genre but it was not one that I'd heard of until I stumbled upon it hanging out on my bookshelf and I then remembered that I had been given it as part of a 'thank you' gift bag from Bliss Magazine when I did a work experience placement there.  I'm not too sure how I feel about this book at the moment as it's what I consider very clichéd YA fiction and what I mean by that is, that it involves the standard guy meets girl storyline and it just seems very easy so far to correctly guess what's going to happen next.  I'm going to stick it out with Boy Nobody though as I always have to finish a book, no matter how bad it is, plus I do believe that some novels do take a little while to get into and I'm all about equal opportunity when it comes to books and reading!


So that's my September reading so far - have you read any of these or got any recommendations for a good September read?  Drop me a comment below!

Sunday, 21 September 2014

First Time at the Opera

Opera - it's never really appealed to me, I guess you could say that I'm a little bit more Taylor Swift than I am Plácido Domingo, but I always like to try new things so when my mum asked me on Friday if I was interested in going to see Rigoletto at the Royal Opera House this weekend, I was all like 'um....YES'.

Pretty decent view!

Even though I've never been an opera fan, I would have been a fool to pass up this operatic experience, plus how do you really know that you don't like opera if you've never actually experienced going to one - it's like this one time I decided to try beetroot even though for years I'd claimed that I didn't like it so I forced myself to try it and as it turns out, beetroot's not so bad, so now I have an extra component when I make salads (which I almost never make).  I feel like my point's been lost somewhere in this brief interlude.  I think that what I am trying to say is that beetroot, or in this case, opera, needed to be tried in order to actually assess whether I disliked or liked it. 


Fancy!

Before the opera, my mum gave me some pre-Rigoletto reading to do, yep, that's right, this trip came with homework (she nearly lost me at this point) but I persevered and did my reading.  As it turns out, the reading was pretty useful as it was a somewhat detailed (we're talking double-sided pages here) synopsis of what occurs in each act.  Seeing as the opera is sung in Italian, this pre-reading meant that I had more of an idea of what was happening on stage and even though there were subtitles on a screen throughout, it helped to have some knowledge of what was going on so that I didn't have to rely too heavily on the subtitles. 

Mini 'Alice in Wonderland' ballet figurine display at the Royal Opera House

 *SPOILER ALERT*
In relation to the plot, Rigoletto is about a Duke who likes the ladies.  A lot.  Probably too much.  To simplify the story, the lady-loving Duke, aka the Duke of Mantua, has his wicked way with a Count's daughter at an orgy (you haven't lived until you've seen an operatic staged orgy and some casual full-frontal nudity - which I missed because I was focussing too intently on the subtitles.  I'm beyond disappointed in myself.) and the court jester, Rigoletto, mocks this and gets cursed by the Count (bit extreme but who am I to judge, I've just watched a bunch of opera singers act out an orgy).  This curse results in Rigoletto's daughter, Gilda, falling in love with the Duke of Mantua after he seduces her, Rigoletto arranging for the Duke to be assassinated and Gilda sacrificing her life in the place of the Duke's.  Rigoletto then discovers that the 'assassinated Duke' is in fact his daughter when he uncovers the corpse and holds his daughter in his arms as she dies.  So, as you can see, it was a really upbeat storyline. 

Left: Mini 'The Tsarina's Slippers' figurine display at the Royal Opera House
Right: Mini 'L'heure espagnole' figurine display at the Royal Opera House

Now that I've explained the plot, I will admit the following: yes, I did fall asleep briefly in the first act but it was probably for no more than thirty seconds and, yes,  I definitely needed an ice cream in the interval to wake me up but I did stay fully conscious throughout the second act and, yes, I did actually, really enjoy it.  I would definitely go and see another opera again although I would probably have some form of caffeine beforehand.  However, I think that part of what made going to see Rigoletto so enjoyable was the whole experience of being at the Royal Opera House, acting all fancy-pants and feeling incredibly cultured and sophisticated (pretty ironic seeing as the night before I'd set up a series link for The Real Housewives of Beverly Hills - well, I can't be cultured and sophisticated all the time, it'd be exhausting!).  As much as I enjoyed Rigoletto, I don't think that I would enjoy watching opera on TV as you don't get to experience the atmosphere in the same way that you would if you were actually right there, sitting in the stalls.  I also don't think that I will be adding any opera soundtracks to my iPod anytime soon because, at the end of the day, I am still the girl that likes Taylor Swift and has The Real Housewives of Beverly Hills on series link, BUT, I would most definitely go to another opera again and would encourage anyone else to give it a go, after all, you never know, it might be your beetroot*! 

*Refer to the second paragraph for the 'beetroot' comment to make any real sense!


Monday, 15 September 2014

Office-Appropriate Nails and Reliving my Teen Years

Office-appropriate nails are always a dilemma of mine and I have spent many an evening going through my drawers of nail polishes trying to find a colour or shade that is suitable for an office environment.

In general, I tend to opt for subtle, natural shades such as nudes, beiges, greys, pale pinks - nothing that is too 'in-your-face'.  However, sometimes this all just gets, well, pretty boring, especially for a nail art obsessive like myself.  So, this evening I tried to come up with a compromise: I would stick with this subtle nail polish palette but I would incorporate it into a nail art design.


The key with my chosen nail art look was to stick to the subtle theme and keep it fairly understated which meant no neon colours and clumpy glitters (my heart just broke a little bit from writing that!).  This resulted in selecting only two simple nail polish colours, a grey-based nail polish by Topshop and a shimmery (well, I needed a little bit of glitter, I'm only human!) sheer nude-based nail polish by Maybelline (this is the same one that I used for my nail art looks in the posts Nail Update: Summer, glitter and sparkles! and Black Gloopy Nails, just in case you were wondering......were you actually wondering or have I overstepped the mark here?). 


Office ombre nails!


I went for an ombre nail design as it's a quite soft nail art look and a fairly easy process which doesn't take too long to achieve.  To start off with, I used my standard base coat which is OPI's Original Nail Envy Nail Strengthener followed by one coat of Maybelline's Color Show nail polish in Sugar Crystals.  Once this was dry, doing one nail at a time, I used a Topshop nail polish in the shade Hopscotch and painted the top third of my nail so that it looked like this (this bit does not need to be too neat):


A little messiness is just fine by me!

Once I'd applied the polish to the top third of my nail, I grabbed some tin foil and dropped a few blobs of the Topshop nail polish onto it.  I then grabbed my cosmetic sponge and dabbed it into the nail polish and lightly blotted it on the foil a couple of times before dabbing the nail polish onto my nail using the sponge.  I carefully brought the colour about halfway down, so that the colour faded out as it approached the bottom half of the nail.  I then finished this nail art look off with a coating of Seche Vite's Dry Fast Top Coat to blend the nail polishes together and soften the look even further.  The reason why I did one nail at a time was because I needed my Topshop nail polish to not be completely dry when adding my top coat otherwise it would not have blended as nicely.


Items used from left to right: Seche Vite Dry Fast Top Coat, OPI Original Nail Envy Nail Strengthener, Topshop nail polish in the shade Hopscotch, Maybelline Color Show nail polish in the shade Sugar Crystals and a cosmetic sponge.

I'm really happy with this look as I think that it is subtle enough to be acceptable for an office job but it's still slightly quirky and unique which is very much a good thing in my opinion. 

The irony of this whole nail art look was that whilst I was trying to achieve this 'mature' nail art design, I was reliving my teenage years and listening to 'The Best of Hilary Duff' on Spotify, I'm not even ashamed about it though.......and I'm definitely not ashamed about the fact that I still know all the words to 'So Yesterday'.  Not even a lit bit of shame here, only Hilary Duff-lyric-knowing pride - turns out my teenage years weren't wasted after all!


No shame here!

Feel free to let me know what you think of this look, or Hilary Duff, I'm not fussy!

Thursday, 11 September 2014

Not Ready for the Cold

It's already starting to get cold and now that it's September I am panicking because I am not ready for it.  Not at all.  In fact, I was so determined to ignore this end-of-summer feeling that I felt that it was necessary to keep my summer dream alive so I designed some fun, summery nail art creations to cheer me up.  Take a peek:

The shine on these is exactly why I love Seche Vite's Dry Fast Top Coat!

It's a pretty easy design to replicate, all you need are three different coloured nail polishes, one being a black shade, a base and top coat plus some dotting tools which you can buy really easily (and really cheaply!) off eBay.  I began this design by applying my OPI Original Nail Envy Nail Strengthener to my nails as my base coat and then applied my Seche Vite Dry Fast Top Coat to make them look super shiny as there is no base colour involved in this nail art look.  Then grabbing a smallish (technical term for you there!) dotting tool, I used Barry M's Nail Paint in Matt White to dot on the petals of my flower.  Essentially, you want five petals for the flower so think of a star shape when doing this and it'll make it a little easier, or at least that logic made it easier for me.  For the next step, I used the next size up in dotting tool and selected a Rimmel London nail polish in a yellow shade called Cute as a Kitten Heel and then added a dot to the centre of each flower.  Following on from that, I grabbed my smallest dotting tool and used Barry M's Nail Paint in Black to add a little dot to my white petals just to add a slight bit of definition.  I finished off this design with a slick of the Seche Vite Dry Fast Top Coat and then they were good to go!

Nail polishes used from left to right: OPI Original Nail Envy Nail Strengthener, Seche Vite Dry Fast Top Coat, Rimmel London Lasting Finish in the shade Cute as a Kitten Heel, Barry M Nail Paint in the shade Black and Barry M Nail Paint in the shade Matt White.  Dotting tools purchased via eBay (and yes, some are a little broken, don't judge!).

I absolutely love my flower nail art design, it makes me smile and for a second or two I can almost trick myself into believing that it's still July and summer is in full swing and that the shops aren't already getting in their Halloween stock and displaying their Christmas cards (really Clinton's, REALLY?!).

It's pretty clear from this post that I am a 'summer girl' and I feel so blue when it's over, it's just...I really hate the cold, mostly because about 90% of my wardrobe is made up of summer clothing.  I love being able to wear crop tops, shorts, skorts, mini skirts, maxi skirts, maxi dresses, summer dresses and flowers in my hair.  I am not a fan of having to wear bulky coats, about five billion layers of clothing just to keep warm, gloves (have you ever tried to use your iPhone wearing mittens?  Just don't even go there!) and woolly hats (nobody wants crazy-lady hat hair.  Not a good look.), plus my nose, hands and feet stay perpetually cold until spring finally reappears once again to make those trees blossom and the daffodils erupt from their bulbs just to say 'haaaaai'. 

 
Only bought my favourite summer outfit last month and I'm just not ready to say goodbye yet (black crop top from Topshop and high waisted vintage Levi 501 jean shorts by Peekaboo Vintage from Topshop's Oxford Circus flagship store).

Ok, so now that I've got my anti-winter rant out the way I can move onto something else -  'Phew!' is probably what you're all thinking right now and I don't blame ya!  Anti-winter rant over.   

So I bought the last ever hard copy issue of Company Magazine this week and I've got to say, I'm pretty gutted that it's only going to be available in digital format from now on.  I mean, I get why Hearst (the publisher of Company Magazine) has made the decision to go all-out digital but personally, I think that you can't beat the actual feel of holding a magazine in your hands, flicking through it and inhaling that fresh, just-published magazine scent and sometimes occasionally using it as a fan when it's really hot on the tube and you're pretty sure that you're about to pass out.   

Farewell my old friend, I'll see you again (it'll just be via a screen!). 

Anyway, let me know what you think about anything and everything that I've covered in this post because it'll make my day that teensy bit more interesting!


Sunday, 7 September 2014

Because you're not a true Brit if you don't enjoy a good afternoon tea...

Afternoon tea, I live for it and as harsh as this sounds, in my opinion, you are not a true Brit if you don't enjoy a good afternoon tea.  I like finger sandwiches, I like scones, I like tea and I LOVE cake.  So much. 

I like to think of myself as something of an afternoon tea connoisseur (and what I mean by 'afternoon tea connoisseur' is that I just really REALLY like cake. A lot!) and I've had a fair few afternoon teas at various hotels and cafes around the UK and even had one in the Middle East when I spent a week in Qatar last April and I've yet to be let down by one.  However, I experienced the best afternoon tea by far just last weekend for my brother's 28th birthday when I was introduced to Juliets in Tunbridge Wells (and before you accuse me of some heinous grammatical error, there's meant to be no apostrophe!) and my eyes were opened for the first time to a world of delicious cakey goodness!


When we stepped inside Juliets, the atmosphere was buzzing and it rocked a quirky, shabby chic, almost Shoreditch vibe which I couldn't help but be mesmerized and swept up by.  Everyone who worked there was lovely and they were totally on it with the service despite the place being packed out.  I also adored all their crockery (I never thought I'd ever use the words 'adored' and 'crockery' in the same sentence.  I've changed.), their mismatching teacups and saucers, plates and spoons and quirky teapots made me feel like I had fallen down the rabbit hole and was hanging out at the Mad Hatter's tea party awaiting Lewis Carroll's pen to hit his paper and write up some terrific adventure for me to partake in.  Alas though, Mr Carroll must have been busy that day as no adventure came my way other than the marvellous onslaught of tea, sandwiches, scones and cake (which I was totally ok with, by the way!). 


I'm the first to admit that I'm pretty boring with my tea, I always opt for the standard English Breakfast Tea but it's a decision I've never regretted and what with me being incredibly fussy, it's a decision that has always stood me well, however, Juliets do offer a varied selection of teas if you're feeling more adventurous than me (which you probably are, because I'm a tea bore!).  There's also the option to add a glass of Prosecco or a Bellini to your afternoon tea which is never a bad thing!


Our selection of sandwiches, scones and cakes were brought out to us and I nearly passed out when I saw them on their stands with the anticipation of the soon-to-be feast being almost too much for my excited self to cope with.  The cakes included carrot cake, chocolate brownie and lemon tart and I'm just going to put this out there - the lemon tart was like a little piece of lemony heaven hanging out on my taste buds.  Juliets offered the best scones I've had at an afternoon tea as well, in fact they were probably my favourite element of this entire tea-centred meal, which is weird for me to admit considering I'm not a huge scone lover, so you know, big deal for me and all that! 


I honestly can't wait to go back there, even if just for a piece of one of their homemade cakes.  It was such a lovely way to spend an afternoon with my parents and brother and a great way to celebrate a birthday. 

I would thoroughly recommend Juliets to anyone, even if you don't live near Tunbridge Wells, it is well worth the trip.  Trust me, you won't regret it (mostly because it's impossible to regret anything that involves cake, am I right?!).

Thursday, 4 September 2014

WAH Nails: Marble Nail Art

For those of you out there who aren't already aware, I'm somewhat of a WAH Nails enthusiast and when I'm not constantly scrolling through their Instagram pics then I'm eagerly checking out their Twitter feed awaiting some new nail art revelation. 

I recently stumbled upon WAH Nails' YouTube page and their nail art tutorials and the only way I could have been more excited was if I was actually at WAH Nails getting my nails done!  I couldn't help but want to try out one of the designs so I went with the most recent video upload which was their 'Candy Marble Nails' tutorial.  I decided after watching the video that I would adapt the design somewhat and so I went for a different selection of nail polish colours as I wanted a really vibrant finish.  I also did more of a mismatched swirl in my marble design compared to the one done in the tutorial but the technique was completely the same.  I love this design as the effect comes out different on each nail and you can swirl the nail polish anyway you choose which injects a bit of personality into the overall look.


The beauty of this nail art design is that you don't even need any nail art tools - just a couple of nail polishes (I used 4 different colours), a base coat, top coat and some cocktail sticks.  It's a super simple concept that creates such a strikingly stunning nail art look. 

Products used from L to R: Seche Vite Dry Fast Top Coat, OPI Nail Envy Nail Strengthener, Barry M Gelly Hi-Shine Nail Paint in the shade Blue Grape, bright pink Kelly Brook Nail Polish (available from New Look), Barry M Nail Paint in the shade Foil Effect (gold), Barry M Nail Paint in the shade Matt White and cocktail sticks.  

All I did to create this look was start off with my OPI Nail Strengthener base coat and I then applied one coat of Barry M's Gelly Hi-Shine Nail Paint in the shade Blue Grape.  Afterwards, doing each nail one at a time starting with my thumb nail, I applied some blobs of my Barry M nail polish (the same one I mentioned in the previous sentence) onto my nail followed by blobs of Kelly Brook's nail polish in a bright pink shade and then some blobs of Barry M's Nail Paint in the shade Foil Effect (Gold) and finally some blobs of Barry M's Nail Paint in the shade Matt White.  Once I was all blobbed out, I grabbed a cocktail stick and swirled it through the wet nail polish which created a marvellously dreamy marble effect.  After I had done this blobby/cocktail stick routine on each nail, I finished off the design with a slick of Seche Vite's Dry Fast Top Coat and I was good to go!


This nail art look essentially gives you a very similar finish to water marble nail art but without the clean up or sellotape prep that you would have with the water marbling process for your nails.  Don't get me wrong, I love doing water marbling on my nails but it can be quite fiddly and sometimes a little messy around the nail.

It took me about 25 minutes to achieve this WAH Nails marble design which just makes it even more amazing if you ask me - it's quick, it's simple, it's easy, you don't need any fancy tools and it looks so incredibly striking that you'll be getting compliments all day!

Here's the WAH Nails YouTube tutorial which I was referring to in this post, check it out:


Let me know what you think about this nail art design, I'd love to hear from you!

Wednesday, 3 September 2014

Skincare: Getting Back to Normal

Ok, so I've been pretty ill over the last few days which has prevented me from any blogging or computer-related activities so I've mostly been confined to my bed whimpering 'Oh, woe is me!' over and over again (because when people are ill, they should most definitely quote a line from Hamlet.  Don't blame me, blame Shakespeare.).  Without going into too much detail, my illness/virus/bug/whatever-you-want-to-call-it was very much reminiscent of a certain scene from The Exorcist.....I think you know where I'm going with this.......let's just say there was some nausea involved and leave it at that so I that can stick to this ladylike façade of mine.

Now that I'm feeling a little better and can actually keep food down (woohoo! COME AT ME DRY CRACKERS!) I'm just about to begin the process of getting my skin back to normal.  I'm still in the early stages of rehydrating myself and drinking bucketloads of water just to stop my incessant dreams about juicy grapes, peaches and strawberries - for some reason, that's all I dream about when I'm ill and dehydrated.  Great, now I can't stop thinking about juicy fruit.  This dehydration has affected my skin and left it in a pretty unhappy state and it hasn't helped that by being ill, my daily skincare routine has fallen by the wayside.


So I'm now ready to tackle my poorly skin and get it back to it's normal, healthy state.  This doesn't mean going full force, I always think it's best to just go back to using my standard products as anything too strong or too heavy could upset it (oh, the joys of having sensitive skin!) plus I kind of think it's best to gently coax you skin back to normal rather than aggressively ambushing it unnecessarily! 


I've always believed that you don't need to spend loads of money on skin products, it's just a case of knowing what ingredients you're after and what works for your skin.  I'm someone that suffers from oily/combination skin with the occasional hint of dryness throw in (wahey!) so my morning routine always includes Neutrogena's Visibly Clear Oil-Free Facial Wash (£4.49 for 200ml).  This is a great cleanser for oily skin as it contains salicylic acid which is an amazing exfoliating agent for oily/greasy skin and it was actually recommended to me by a dermatologist and you really can't argue with a skin expert!


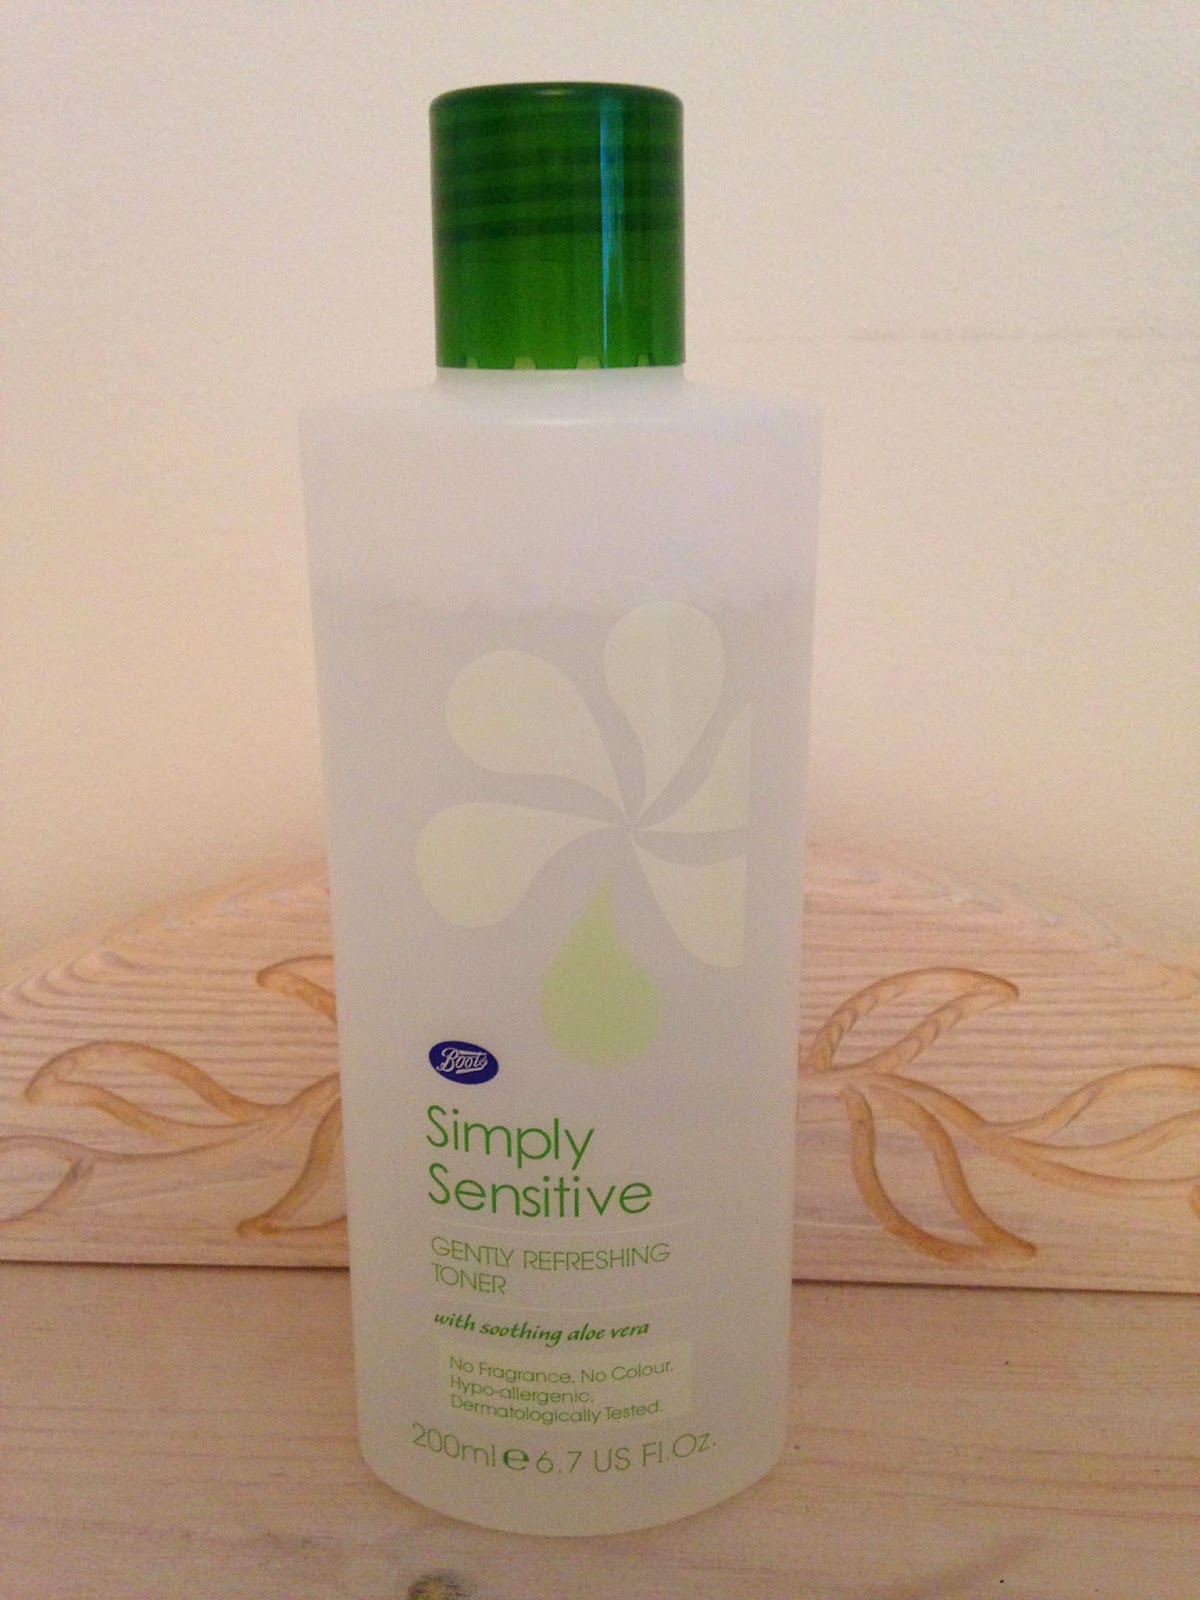
When it comes to toner, I've always used Simple Kind To Skin Soothing Facial Toner (£3.29 for 200ml) however recently I decided to branch out when I saw that Boots had a half price offer on their Simply Sensitive range which resulted in me spending a not-so-whopping £1.34 (normally £2.69) on a bottle of their Gently Refreshing Toner (200ml).  I have to say that there is little difference between this toner and the Simple toner, it removes any leftover makeup and your skin feels incredibly clean afterwards.  Also, even at its full price of £2.69, the Boots Simply Sensitive toner is still cheaper than the Simple toner which makes it even more attractive!


Now to the moisturising and the most expensive product in my skincare routine - Olay Essentials Complete Care Day Fluid for normal/oily skin.  I love love LOVE this moisturiser, it's light enough for oily skin but still leaves your skin feeling hydrated and soft which is exactly what I'm after from a moisturiser.  It's a little pricey at £9.99 for a 200ml bottle but they also offer a 100ml for £5.99 - plus you'll often find that there is half price offers on this range in Superdrug or Boots so I normally purchase the 200ml bottle when it's half price and by the time I run out (it lasts a long time!) then there's normally another offer on.  They also offer a sensitive version of this product which is mighty handy!


Focussing on the moisturising situation, now would be the time that I would crack out my Chapstick......but I lost it and I have NO idea where it is so instead as my backup I've got Palmer's Lip Balm Cocoa Butter Formula with Vitamin E (£1.89 for 4g) which I love, just not as much as Chapstick but it's a solid second best.

I pretty much use the above products that I've just spoken about every morning in that order and stick with it for my night time routine as well, with only a few added extras which are mentioned below!


Before I go to bed and after I've moisturised my face and my lips, I like to use a little bit of Quinoderm 10 (£2.65 for 25g), which is an acne cream.  Now, I don't have acne but like most people, I get the occasional blemish so what I like to do is pop a little bit of the cream onto a cotton bud and apply it to the blemish and rub it in.  This product was recommended to me by the same dermatologist mentioned earlier in this post as the cream is strong enough to dry out spots (or pimples if you're American!) but it's not overly strong that it's going to leave dry patches on your skin.  I normally have to get this from the actual pharmacy section in Boots or Sainsbury's but you don't need a prescription for it so it's pretty easy to get hold of.  Also, this cream is available in varying strengths, I believe that you can also get Quinoderm 5 which is a weaker composition of the cream but I don't I find this as effective at blemish removal for my skin as Quinoderm 10.


Finally, if I have any sneaky little dry patches on my skin then I like to use Vaseline Original Pure Petroleum Jelly (£2.15 for 100g) on these patches.  I find that this classic product works much better when used on actual dry skin as opposed to on my lips as it ALWAYS dries my lips out and from speaking to other people, I know that I am not the only one that this happens to.  Weird, huh?

Right, so that's my standard day and night skin care routine and it's also what I'm going to be throwing at my skin in order to get it back to its former glory, wish me luck and also let me know of any other products that you can recommend to help my skin recovery or if you're a fan of any of the products mentioned in this post!